目前打算用微信读书读的同时做标记
读完一部分后统一整理到这里
2022/10/26更新:
还得是英文文档
Internet Models和Network Module
200/12/27更新:
还得是debug😭
==一些资源汇总:==
ns3 Google 论坛(还在活跃更新)

记点笔记
tutorial
使用waf来build ns3项目时,waf依赖的是python2,需要使用
sudo python2 ./waf configure来构建(添加上使用python2的option),否则会有各种:syntax error
NameError: name ‘file‘ is not defined(file(),见这里)
异常的捕获 python2:
1
2
3
4
try:
raise
exceptException, e:
...python3:(区别在as)
1
2
3
try:
raise
except Exception as e:依赖错误(bunzip2: Data integrity error when decompressing.)()
不能用
#!/usr/bin/env python2,参考运行旧版本ns3程序(3.17)
切换gcc版本:两种方法:
sudo update-alternatives --config gcc或 进入/usr/bin更改软链接切换g++版本:只能进入
/usr/bin更改软链接报错
NS_LOG_FUNCTION中的<<运算符重载错误:error: ambiguous overload for ‘operator<<’ (operand types are ‘ns3::ParameterLogger’ and ..先安装gcc-5和g++-5,安装教程
在这个过程中,可能会把g++的软链接丢掉,此时
g++ --version都会显示Command 'g++' not found, but can be installed with: sudo apt install g++,但实际上是安装了g++的,可以通过ls/usr/bin/g++*查看已有的版本(包含软链接)此时需要两步,参考
cd /usr/binsudo rm -r g++ //移除之前的软链接(在软链接存在时可以不用这步)sudo ln -sf g++-5 g++ // 建立g++-5的软链接
可以通过
sudo update-alternatives --config gcc来快速选择gcc版本但g++不仅不能这样选,对g++使用上面的命令还会丢失其软链接
查看gcc版本:
gcc -v查看g++版本:
g++ --version在
/usr/bin下有各种包,其中就包含gcc和g++的各种版本软链接是将
/usr/bin/g++指向某个特定的版本,如/usr/bin/g++-5,即为g++-x创建一个名为g++的快捷方式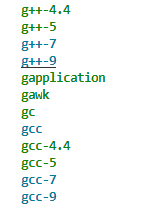
ls/usr/bin/g++*的结果如下所示:
命名空间
待补充
trace
如果说属性变量是模拟脚本的输入,那么trace变量就是模拟脚本的输出。它的目的是对网络模拟中的一些重要网络行为进行记录,并以用户可配置的格式输出记录结果。
与属性变量一样,trace变量本质上也是C++类的成员变量。但它不是一般类型的变量,而是一个函数指针。在使用时,用户需要在脚本中预先定义一个函数(即回调函数callback),然后通过trace系统将其与某个C++对象内部的函数指针(trace变量)相关联。在模拟过程中,每当有特定的网络行为发生时,ns-3源代码就会调用相应的trace变量函数指针,进而触发脚本中的回调函数。同时一些重要的模拟数据会通过回调函数参数列表的形式传递给脚本。这样通过在脚本的回调函数中打印相关信息,就可以在模拟运行过程中获取有用数据。此外,用户还可以在回调函数中根据需求自定义信息输出格式和对象(如屏幕、本地文件等)。以上就是ns-3中数据提取的基本过程(见下图)。

trace变量的配置方法可以根据单次可配置trace的数量分为以下两类
助手类
Config::Connect()和ObjectBase::TraceConnect(),注意两个函数不是同一个类的Config::Connect()函数原型:
void ns3::Config::Connect(std::string path, const ns3::CallbackBase &cb)参数:
[in]– path A path to match trace sources.(trace变量命名空间路径)[in]– cb The callback to connect to the matching trace sources.(回调函数指针)例子:
Config::Connect ("NodeList/*/DeviceList/*/$ns3::PointToPointNetDevice/MacTx", MakeCallback(& MacTxCallback));上面这个例子的命名空间路径即可match多个trace,这正是Config::Connect()可以单次配置多个trace的原因(可以在命名空间路径中使用通配符)
上面这段代码将一个脚本中定义的MacTxCallback()回调函数指针赋值给所有PPP网络设备PointToPointNetDevice对象的MacTx trace变量。每当一个PointToPointNetDevice发送分组时,MacTxCallback()函数就会被执行并打印分组的接收时间和字节大小。
Config::ConnectWithoutContext()如果不想打印命名空间路径,则可以使用Config::ConnectWithoutContext()函数。其使用方法和参数与Config::Connect()基本相同。
函数原型:
void ns3::Config::ConnectWithoutContext(std::string path, const ns3::CallbackBase &cb)参数:
与Config::Connect()相同
ObjectBase::TraceConnect()函数原型:
bool ns3::ObjectBase::TraceConnect(std::string name, std::string context, const ns3::CallbackBase &cb)参数:
[in]– name The name of the target trace source.[in]– context The trace context associated to the callback.[in]– cb The callback to connect to the trace source.例子:
1
2
connected = emitter->TraceConnect ("Counter", "sample context", MakeCallback (&NotifyViaTraceSource));
NS_ASSERT_MSG (connected, "Trace source not connected");如你所见,上面的例子中单次只配置了emitter中的一个trace(单次一个)
且与Config::Connect()的不同之处在于,ObjectBase::TraceConnect()直接从代码中获取对象(直接调用了对象emitter的TraceConnect()方法),而Config::Connect()则通过命名空间路径来获取对象
ObjectBase::TraceConnectWithoutContext()该函数没有context参数,不会输出指定的context字符串(context意为上下文,就是作为一个普通的string输出来提示语境的)
函数原型:
bool ns3::ObjectBase::TraceConnectWithoutContext(std::string name, const ns3::CallbackBase &cb)参数:
[in]– name The name of the target trace source.[in]– cb The callback to connect to the trace source.例子:
senderSocket->TraceConnectWithoutContext ("CongestionWindow", MakeBoundCallback (&CwndChange, nodeDevAddrs[LPUs[i]][0].second, tcpSocket));
只能在一个已存在的C++对象上配置trace变量
因为ns-3并没有提供trace变量的默认值。在对象创建时无法根据事先配置好的函数指针来初始化trace变量。
此外,trace变量作为对象中的一个函数指针,在对象未创建、未非配内存时是无法进行配置的。这也是我们通常把trace变量的配置操作放在网络拓扑和应用建立完成之后的原因(但必须在Simulator::Run()之前)。这时各个网络层的主要C++对象都已经建立完毕。
一个例外是套接字(Socket)对象
ns-3的内置应用(如BulkSendApplication在StartApplication()中调用Socket::CreateSocket())使用Socket对象向传输层发送分组。由于这些内置应用的Socket对象都是在应用程序启动时才被创建(这也符合实际,在ibc的MsgGeneratorApp中,socket在application被install时就被创建,这并不符合实际),因此直接在脚本中为Socket对象的trace变量设置回调函数会引起程序崩溃。
这时一个比较通用的做法是在脚本中使用Schedule()函数把配置trace变量的时间点放在应用程序启动之后。
对这部分操作感兴趣的读者可以参考src/traffic-control/examples/codel-vs-pfifo-asymmetric.cc脚本中的TraceCwnd()函数。这个函数在应用程序启动后的0.00001s被调用并为trace变量配置回调函数。
为一个trace变量关联多个回调函数
trace系统还支持为一个trace变量关联多个回调函数。当trace变量被触发时,这些回调函数依次被执行。读者可以利用这个特性对同一个trace变量输出不同的记录内容。
我们还可以使用
MakeBoundCallback()函数将更多用户指定的参数传递给回调函数
ns-3使用
获取Header
获取
Ipv4Header和TcpHeader这种Header时最好用PeekHeader()不然用
RemoveHeader()还要记得再AddHeader()但是好像要获取TcpHeader必须要先把外面的PppHeader和Ipv4Header去掉
DynamicCast
QueueDiscItem中没有
Ipv4Header,即使QueueDisc层在ip层下面,没办法直接用QueueDiscItem获取Ipv4Header但是
TrafficControlLayer::Send()这个函数的参数是Ptr<QueueDiscItem>
调用者传入的是
Ptr<Ipv4QueueDiscItem>类型【这是为了避免可能是Ipv6】
Ipv4QueueDiscItem是QueueDiscItem的子类,TrafficControlLayer::Send()函数中可以用DynamicCast将QueueDiscItem转换为Ipv4QueueDiscItem类型(即下行转换)下行转换中,最好用dynamic_cast,而
DynamicCast是ns-3对dynamic_cast的封装参考这篇文章,讲得很好:[C++中static_cast和dynamic_cast强制类型转换(https://blog.csdn.net/qq_26849233/article/details/62218385)

所以原问题解决方案是:
1
2
3
4
Ptr<Ipv4QueueDiscItem> ipv4Item = DynamicCast<Ipv4QueueDiscItem>(item);
Ipv4Header ip = ipv4Item->GetHeader();
uint32_t srcAddr = ip.GetSource().Get();
uint32_t dstAddr = ip.GetDestination().Get();
packet size != segment size
message的末尾可能会出现这种情况
使用stl中的
string不需要
#include <string>,只需要直接用std::string声明cmake可以设置debug模式和release模式
两个模式有一些区别:【C++】Debug模式和Release模式的区别
cmake中设置的方法:cmake的debug和release模式设置
非debug模式会
#define NDEBUG这个宏为什么application启动时间需要用一个值,不是0
在流启动之前有一些东西可能要配置,在我们这里似乎没有,主要是为了避免静态配置和动态配置之间出错
如果设置成0的话
有可能流启动的事件就插在配置事件里,就可能出错
也可以是0.001s,无所谓,反正后面算速率的时候都要减掉刚开始这个时间
DelACKCount默认值居然是2!!

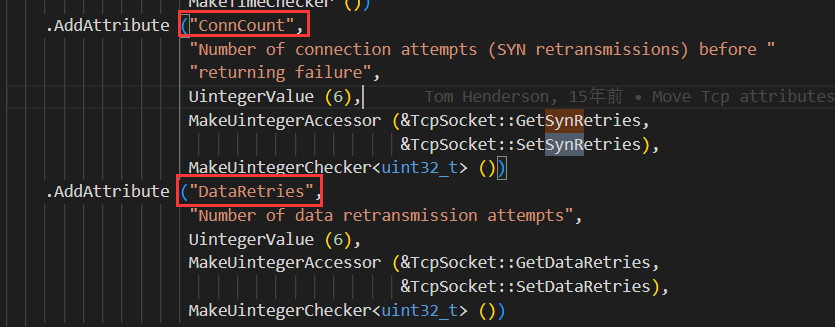
ns3中TCP的断连Rto次数是有限制的,超过限制次数连接就会drop
下图这俩一个是建立连接过程中的Rto次数限制,一个是建立连接后的Rto次数限制
m_tcb→m_cWnd 想了个歪点子 用回调来保证修改所有地方
需要注意的是:直接用
Simulator::Schedule (Seconds(0), &modifyCwndSize, tcpSocket, fixedCwndValue);有风险,ns3会在同一个event里面修改后使用窗口的值这里的解决方法是:修改回调底层的(赋值)和(调用函数指针)的顺序,见下图(路径:src/core/model/traced-value.h)
(我是另外重新跑了一遍原来的实验,确保修改前后不会改变结果)
(但是到底会有什么副作用,尚未发现)

应用层和L4交互
application不断压包 和 有一个很大的SendBuffer等效
(在网络看来等效)ns-3中Sender端TrafficControl层会丢包

tc层的queue(qdisc)和device层的queue
一般DropTailQueue的MaxSize都设置成1p
问题来源:
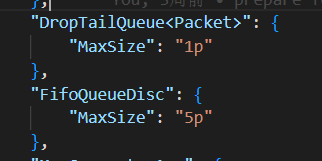
解答:
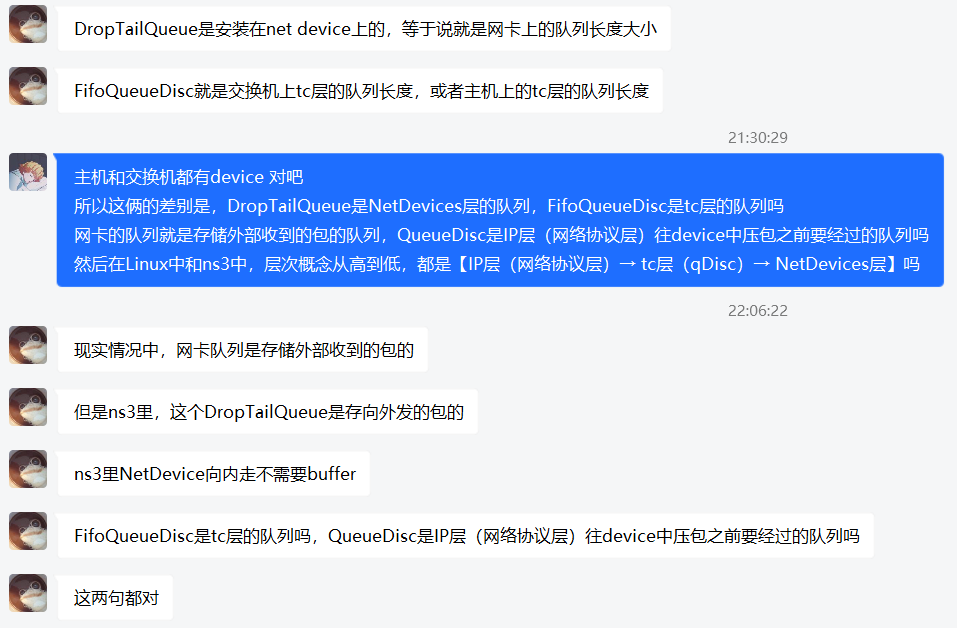
==自己的想法:在NetDevice层的队列中,只会累积一个来源的包;但是在traffic-control层的队列中,多个来源的包汇聚,才会出现队列增长,以及丢包==
-
UdpEcho
OnOffApplication
BulkSendApplication
This traffic generator simply sends data as fast as possible up to MaxBytes or until the application is stopped (if MaxBytes is zero).
Once the lower layer send buffer is filled, it waits until space is free to send more data, essentially keeping a constant flow of data. Only SOCK_STREAM and SOCK_SEQPACKET sockets are supported. For example, TCP sockets can be used, but UDP sockets can not be used.
UdpClient
UdpClient就是Install一次发一段数据,一段数据可以有很多个包,所以会有MaxPackets和Interval作为参数
DCE和NSC
NSC(Network Simulation Cradle):
The Network Simulation Cradle (NSC) is a framework for wrapping real-world network code into simulators, allowing simulation of real-world behavior at little extra cost. This work has been validated by comparing situations using a test network with the same situations in the simulator. To date, it has been shown that the NSC is able to produce extremely accurate results. NSC supports four real world stacks: FreeBSD, OpenBSD, lwIP and Linux.
-
Direct Code Execution (DCE) is a framework for ns-3 that provides facilities to execute, within ns-3, existing implementations of userspace and kernelspace network protocols or applications without source code changes. For example, instead of using ns-3’s implementation of a ping-like application, you can use the real ping application. You can also use the Linux networking stack in simulations.
ns3中的Error Model:
This section documents a few error model objects, typically associated with NetDevice models, that are maintained as part of the
networkmodule:- RateErrorModel
- ListErrorModel
- ReceiveListErrorModel
- BurstErrorModel
Error models are used to indicate that a packet should be considered to be errored, according to the underlying (possibly stochastic or empirical) error model.
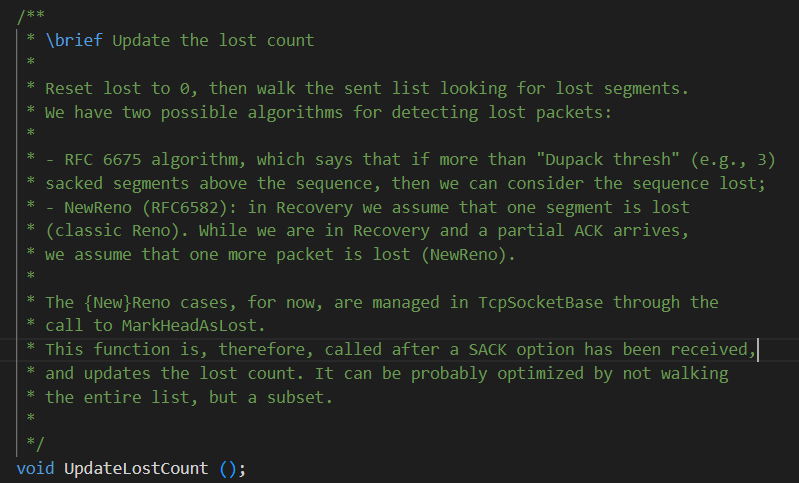
ns3::TCP中的mark as lost算法:
node、device、QueueDisc、Ip的关系:
一个node可以有多个device(一个device就相当于一个网卡),node A每与别的node建立一个channel就需要一个device
一个device有一个QueueDisc,一个Ip
std::map<Ptr<Node>, std::vector<std::pair<Ptr<NetDevice>, ns3::Ipv4Address > > > nodeDevAddrs;这个数据结构可以描述对应关系
node:device=1:n
device:QueueDisc=1:1
device:IP=1:1
所以,排队都在egress队列中排
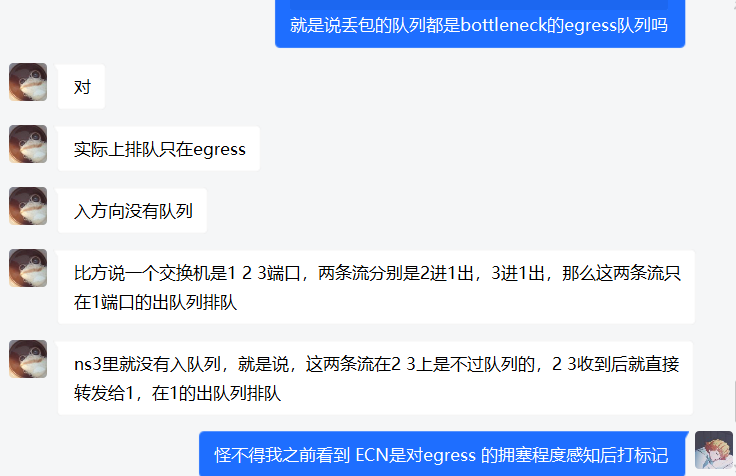
QueueDiscItem,是Ipv4QueueDiscItem的基类,要用DynamicCast转一下才能使用Ipv4QueueDiscItem这个类型的接口对
QueueDiscItem直接用->GetPacket ()->GetSize()得到的是仅到L4的包(没有ipv4头),我们需要用Ipv4QueueDiscItem的GetHeader拿到ipv4头,才能判断是UDP包还是TCP包TCP不存在给定速率的做法,因为其速率是通过AIMD自己探测出来的
UDP没有拥塞控制,需要直接设定速率
- 本文链接:https://wan-nan.github.io/2022/10/16/ns-3%E5%AD%A6%E4%B9%A0/
- 版权声明:本博客所有文章除特别声明外,均默认采用 许可协议。